How to set up Transactional E-Mail for Salesforce via SMTP
This tutorial provides administrative guidelines to connect the cloud email service Retarus Transactional E-Mail Service (SMTP) with Salesforce. This connection will allow to create and submit arbitrary numbers of Salesforce-originated mails to the enterprise cloud service, which takes care of the subsequent SMTP based processing, mail delivery and reporting chain.
In this tutorial, the SMTP protocol is used for the mail transmission. Retarus also provides the Transactional E-Mail service as REST(OAS) service, but that is beyond the scope of the tutorial. You can find additional information in the EAS documentation section.
The implementation of the SMTP service adapter consists of three steps outlined in the following chapters:
- Setting up the email relay
- Establish an email domain filter
- Testing the solution
Prerequisites
To perform the steps described here, following prerequisites must be given:
- Transactional E-Mail SMTP service was provisioned and activated by retarus.
- Retarus login credentials (account identifier with password) is available.
- The respective service URL was provided by retarus.
Please note, account names here are usually not people’ names, but rather something like lhsdf-SKs3EaaaaabEq3mHn_GehH3jD2s@mail-de.retarus.com
The necessary credentials will be provided by Retarus in the implementation phase.
Adapter setup instructions
This chapter describes how to set up an email relay for Salesforce-generated mails by configuring Salesforce to automatically route outbound emails through the Retarus mail services using SMTP.
Please note: If emails originate from more than one domain, it is possible to configure multiple email relays, for instance one relay for each domain. In this case, activate the multiple email relay feature.
Creating the mail relay connection
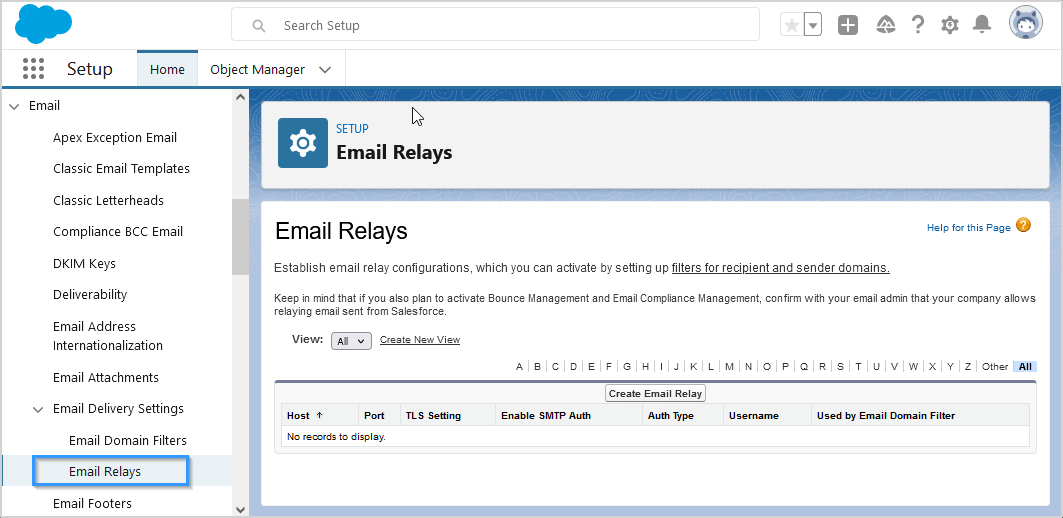
To get started, enter the Salesforce SETUP section.
To configure the mail releay, select ‘Email Relays’ from the left-hand menu.
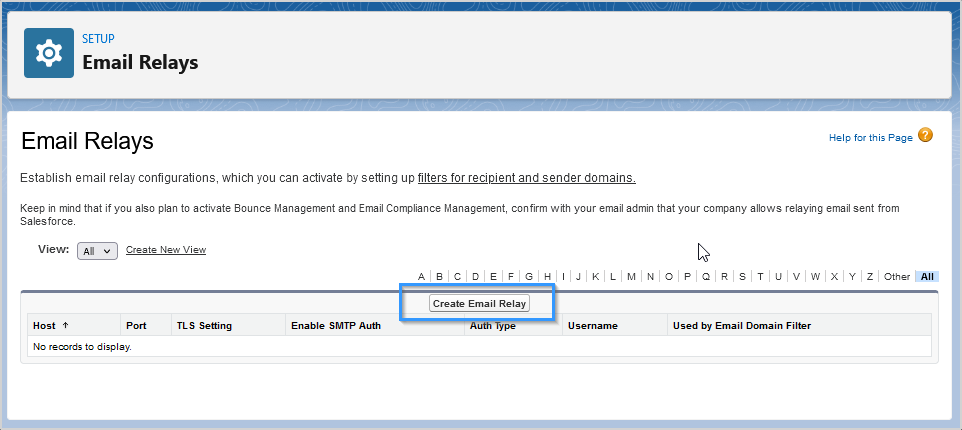
Select ‘Create Email Relay’
Configure mail relay
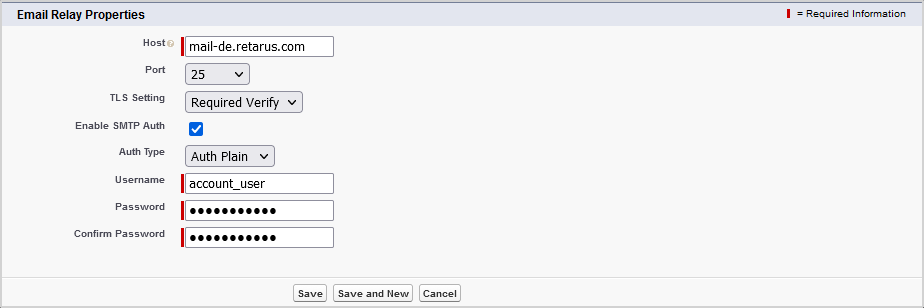
The email relay properties window is shown.
Configure the relay using the settings outlined below.
| Setting | Configure | Setting |
|---|---|---|
| Host | t.b.a. | The host name of the sending Retarus SMTP server for a specific sending domain. This information will be made available through retarus in the service setup phase.Host names use the following format: |
| Port | 25,576 or 2525 | The port number of your company’s SMTP server. Relaying of email is supported on port numbers 25 (preferred), 587 or 2525. |
| TLS Setting | Required Verify | The Retarus service requires enabled TLS to operate. Select “Required Verify” |
| Enable SMTP auth? | ACTIVATED | In the Retarus environment, Auth Plain is used with Username and Password provided by Retarus. Make sure that the checkbox is activated. |
| Auth Type | Auth Plain | Select “Auth Plain” |
| Username | t.b.a. | Specify the username for relay host SMTP authentication. If “Enable SMTP Auth” is set to true, this field is required. |
| Password | t.b.a. | Provide the password for relay host SMTP authentication |
| Confirm password | t.b.a. | Confirm your password |
Setting up an E-Mail domain filter
Next we setup an email domain filter, which determines whether an email relay is restricted to specific domains or not.
Select ‘Email Domain Filter’, and select ‘Create Email Domains Filter’. Configure according to the table below
Configure the domain filter dialogue.
| Setting | Description |
|---|---|
| Sender Domain | Restricts the email relay to sending emails based on the listed sender domains. This field accepts comma-separated values and supports the wildcard character * . The default is * |
| Recipient Domain | Restricts the email relay to sending emails based on the listed recipient domains. This field accepts comma-separated values and supports the wildcard character * . The default is * |
| Email Relay | Select here the mail relay for the domain filter, which was created before. |
| Active | Enables or disables the domain filter. For the retarus adapter described here, activate the filter. |
Please note, it is recommended to discuss the best definition of domain filters, in particular the usage of wildcards, ahead of the go live. In case of uncertainties don’t hesitate to discuss this subject with your Retarus representatives as well.
Finally, save the page.
Configuring Deliverability Settings
Once the email relay is enabled in Salesforce, companies do not necessarily need all the Salesforce Email Deliverability settings located in Setup, e. g. Bounce Management with Email Relay.
Some of these settings modify the envelope-From address of emails sent from Salesforce. The header From address remains set to the sender’s email address. The return-path in the headers is also modified. This change in the email headers may affect email delivery to your email server, as the modified return-path includes a Variable Envelope Return Path value (VERP).
Example of a standard return-path: name@domain.com Example of a VERP return-path: <name@domain.com__x@x.bnc.salesforce.com>
Config guidelines
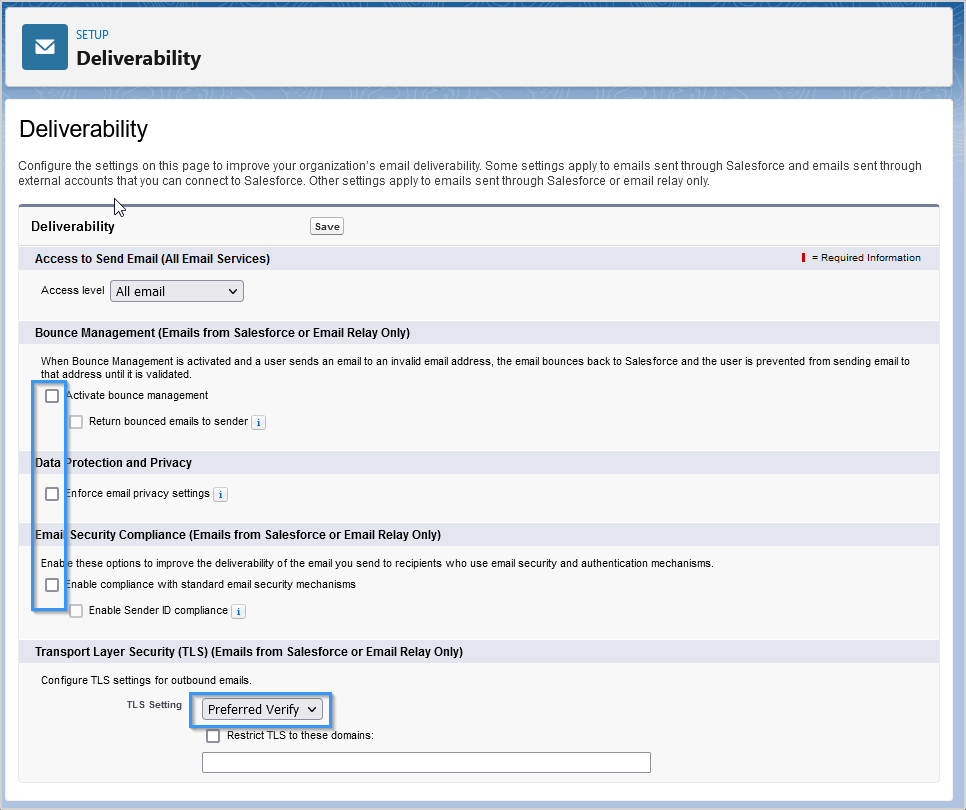
Select Email -> Deliverability from the setup menu and configure the options as outlined below
• Turn off “Activate Bounce Management” as the Sender Domain will be overwritten and therefore not accepted at Retarus Transactional Email • Turn off “Enable compliance with standard email security mechanisms” • Turn on “Configure TLS settings for outbound emails” with “Required Verify”
After making these settings, outbound emails sent from Salesforce to the cloud mail relay server will show both envelope-from and return-path as e.g. name@domain.com
.
Find the related option via the setup menu and disable it:
Disable Enhanced Email
Due to the fact that Salesforce is rewriting the Email-From Address for Open and Link Tracking, Enhanced Email has to be disabled.
Verification of the adapter
Send test email
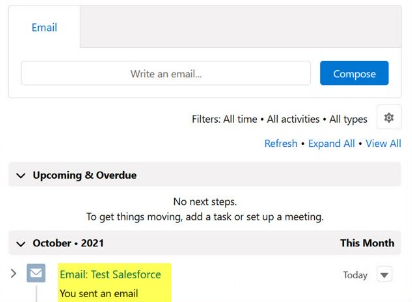
To make sure that the configured adaptor works as intended, write an email to a new or existing test contact with an operational email address directly from the new contacts ‘activity’ tab.
We assume familiarity with the steps outlined here. In case of any questions here, please refer to the official Salesforce documentation.
Verify success in Salesforce
Let’s check the success of the mail transmission in SalesForce first.
After a successful mail transmission, we should see an acknowledgment directly in the email summary.
Verify success in retarus EAS Portal
Additionally, the retarus EAS - Enterprise Administration System portal provides access to configuration options as well as reporting and tracking of inbound and outbound messages.
Visit https://myeas.retarus.com/ and login with your EAS admin account credentials.
Please note: Don’t confuse the EAS login credentials is with either SMTP server credentials or Transactional mail account ID’s. Service administrators obtain an EAS (myeas.retarus.com) account in the setup phase from retarus or their own responsible retarus service admins. This credentials are necessary to log into the EAS portal, but are different from particular service credentials.
Retrieve your mail status data
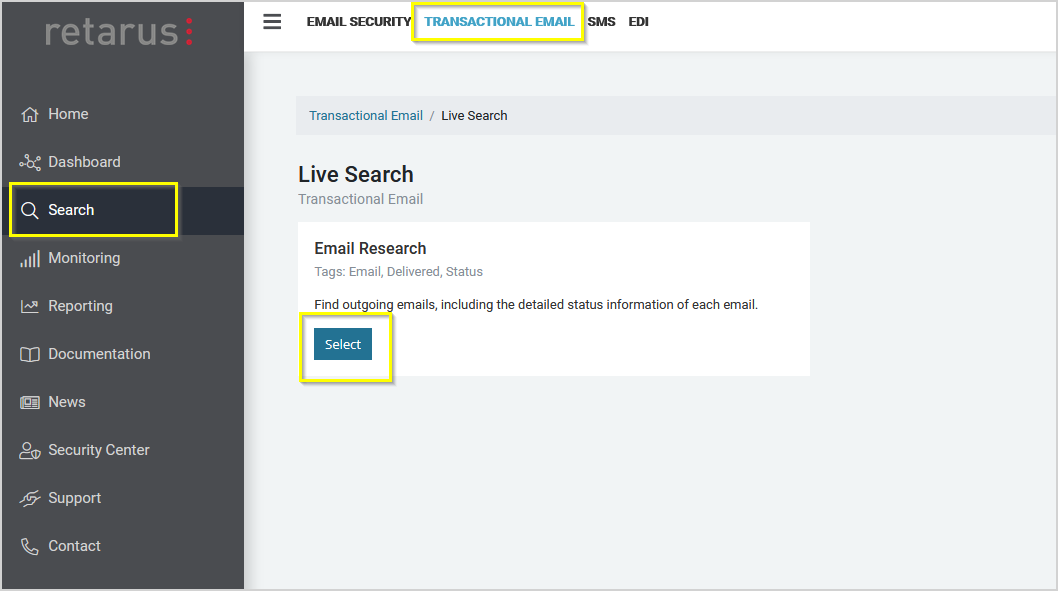
To check your recently sent Salesforce mails select Transactional Mail in the top menu and in the left hand menu Search.
In the myEAS reporting view, you can easily retrieve and analyze the mails just sent from Salesforce.
Please note: The availability of reporting or tracking views in EAS/myEAS depends on service booking modalities, and also upon certain user rights, which have to be enabled for your EAS account. In case you are missing something in EAS, please contact your administrator and check your portal user security level (“Customer admin” or “Customer staff”), and the related mail settings.
For further information, please check the supporting documentation in EAS, or get in contact with your retarus representative.

